Search This Blog

Sunday, January 27, 2013

Inspiration from facebook and sprinkles?

As most people do,  I was browsing pages on facebook. Most of the time they are nail related, but sometimes you just need something to make you laugh you know? I stumbled across this page called 9 To 5 LOL, scrolled through the mountains of funny pictures and came across this little gem on the left:
     
I then thought to myself, "how awesome would that look on your nails?" And so my sprinkle nails were born.
 
 
It's really not difficult to do, so I hope you can do it too! :)
That would make my day to see someone recreate my nail work!


Anyways, on to the nailtastics...
 
To the right are all the items I used.
 
Step One: Paint all of your nails white. It will serve as a good base coat.
 
Step Two: Take your favorite clear and paint your thumb nail with it. Do step three before it dries.
 
Step Three: Place your nail in a shallow bowl filled with the sprinkles, and then make sure they cover the nail adequately. (Shown at right)


Your finished product will be the picture on the left; however you can take it a step further by adding dots to finish the colorful look like the picture on the right!


Hope you enjoyed my brief tutorial!

Until next time,
Peace,
Rikya

Friday, January 25, 2013

Naughty Nails Contest (Warning: a little risque!)

So I found a nail art contest on Facebook that has a whole bunch of sponsors like Different Dimension and Above the Curve so I figured since I need some practice at nail art I would enter and give it a go. (Worst thing that happens is that I get some experience.)
Here's my picture!
I didn't want it to be overtly sexual, I just wanted it to be risque and suggestive enough to enter. Bear with me: it is supposed to resemble a barely clothed lady, with a sensor bar covering her chest and a strawberry covering her "nether regions." I also did kiss marks down her stomach and the pinkie nail is supposed to be all x's, like XXX.

Hope you guys enjoyed this and that it wasn't too offensive for anyone of you! I figured putting the warning in the post title would make sure that if people weren't okay with the content then they wouldn't accidentally see something that they didn't want to see.

Until next time, 
Peace, 
Rikya

Thursday, January 24, 2013

Blue Ombre Nails Plus Once Upon A Polish Under the Sea!

So I keep seeing ombre nails literally everywhere! I love them so I figured I would do my own version.
Plus I figured I would do my own version of it!
My favorite color is blue, so I did five different shades of blue from the Sinful Colors line, because I figured it would be the easiest for people to get their hands on, and it wouldn't break the bank.


I used Cinderella...


... and Love Nails...


... and Savage ...

... and Ocean Side...
.... and finally Midnight Blue!


I figured I would kick my mani up a notch with a extra dash of Indie! Bam! Once Upon A Polish's Under The Sea!


 Isn't it gorgeous?!

Hope you liked it!

Until next time, 
Peace, 
Rikya

P.S. Remember that my giveaway is still up on the facebook page, it ends on the 10th of Feb so you still have time!


Thursday, January 17, 2013

Tutorial- Easy Peasy Ladybird

Since I was getting comments that you guys wanted me to do more nail art and tutorials, so here's my attempt at Ladybird nails!!

Here are the tools that I used, but go ahead and switch it up if you want!


Step One: Paint nails a deep red color. I ended up doing two to three coats to get the color I wanted, but for more opaque polish, one coat should be fine.

Step Two: Make a french manicure like sweep of black polish across the top of the nail and then carefully make a thin black line of polish down the middle of the nail. (If your line isn't straight, don't worry! On real ladybugs, they're not always straight, plus the dots will cover some of it up!)

Step Three: Make the dots! Now you're done! That's easy and super duper cute, (and perfect for those little polish people at home!)

However, I took it a step further and made leaves as well.
Step Four: Remove the color on your other nails, and paint them green. I used a Sally Girl Polish, but you use whatever green you love. :)

Step Five: Draw a thin line of green down the center.


Step Six: Draw thin lines off of the main line of green.

Step Seven: Apply this to all of your remaining nails.

And you're done!!

Hope you liked this post!

Until next time,
Peace,
Rikya

Saturday, January 12, 2013

Friday, January 11, 2013

Stained Glass Nails

This is something I based on a piece of stained glass that I have always loved, except I played around with the color scheme a little bit. I am going to attempt to show how I did it as well, so bear with me! :)

Here are the tools I used to create my look, although yours could vary by color or brand.


Step One: Find something plastic, preferably smooth like a plastic sandwich bag. I used a plastic bag for beads, but anything plastic and smooth will do.

Step Two: Apply clear nail polish in a single rectangular shaped layer to the bag. Let it dry fully before proceeding to step three.

Step Three: Do whatever you want design wise. The clear polish will be easy to decorate and will peel off once you are done with it. Here are a couple of photos to give you ideas and to give you a sort of timeline. I used a Sharpie for the outlines and colored in the gaps with different colors of Sinful Colors Nail Polish.

Step Four: Wait until the whole design is completely dry. Peel the design off of the bag, and either place it on the nail directly then cut it, or cut it after it is placed on the nail.

Step Five: Apply a clear top coat onto your nails. And you're finished! :)

Here's my finished product on the right. Isn't it gorgeous? I think it turned out pretty well!

Tell me what you think in the comments. All of your comments are greatly appreciated! :)

Hope you liked this post!

Until next time,
Peace,
Rikya

Thursday, January 10, 2013

Above the Curve's Fallen Angel

I have been teasing you guys and saying that there would be something special on the blog today, and here it is: Above the Curve's Fallen Angel.
Firstly, I want to give a shout out to Shawn and Angel who are the lovely people behind Above the Curve. They are both amazing people, who give a portion of their proceeds from each polish sale to Shriners Hospital for Children. In my eyes, there should definitely be a lot more people like them in this world, who love what they do and give back to those who need it. I really admire what they are doing :)
Go Angel and Shawn!

Now I am one lucky lucky girl, as I won the first set of trivia contests from Above the Curve Polish's facebook page! I was lucky enough to win my favorite of their polishes too: Fallen Angel! (Did I mention I was lucky?)


Here are my bottle shots.
(Can you see all the prettiness?)


There are so many glitters that change colors in this bottle of nail polish. I was~ and am~ still in awe of this polish and how Shawn and Angel made this to be so amazing!


Since this was a very special polish to me, I figured I must up the mani that I do, and so here is my reverse french manicure with full on Fallen Angel as my thumb accent nail!

(Seriously I can't sing this polish's praises enough!
Every polish-head should have a bottle!)

If you don't have enough proof.... just look at the pictures below!!

Without flash, but you can still see all of the glitters


With flash and even more glitters!!


Hope you enjoyed this blog post!!
If you want to buy this polish, or amazing ones like it or even donate, go visit their Etsy store at http://www.etsy.com/shop/AboveTheCurve

Until next time,
Peace,
Rikya

P.S. Remember that at 20 followers on the blog I will be starting my giveaway!

Wednesday, January 9, 2013

Mani based on L.A. Noire in film noir style

I was playing a new xbox game called L.A. Noire. It's a detective game based on 1950's America, and you play a detective. While I was playing, I realized how much I love that era of history, how the people act and talk. This is why this mani is based off of that time period.

I used Sinful Colors Black on Black and Tokyo Pearl as well as  Wet n Wild's French White Creme
I'm not the best at nail art, so please forgive me. I'm still learning :)
My thumb is a martini glass, because if you ever see that era of movies, people are always drinking martinis and smoking.
My index finger is a lamppost. One of the most iconic images of film noir is a woman standing by a lamp post.
My middle finger is the word "noir" written in black and white.
My index finger is a hat. My attempt at the large brimmed hats that they wore in that time.
Finally, my pinkie finger is a gun. You can't have a detective story without a gun.

Anyways, hope you enjoyed my nail art!

Until next time,
Peace,
Rikya

Monday, January 7, 2013

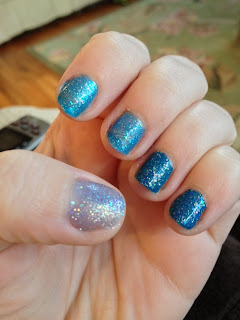
Comparison of Sinful Colors Hottie and Sally Girl Unnamed Blue Glitter

 Firstly, I want to sing the praises of this little pink bottle. I use it for my top coat when I just have *blushes* naked nails. I also use it as a base coat before I put any polish on my nails. It prevents a lot of discoloration too. I seriously am so glad with this polish.

Now onto the main show!!! I compared the small Sally Girl unnamed, and Sinful Colors Hottie. From the bottle shots, you can see the similarities, although Hottie is far darker than the Sally Girl. 
I figured I would show you guys some more bottle shots of the colors I used under the comparison polishes. 
Index and middle: Love Nails SG and Hottie respectively
Ring and pinkie: Ocean Side SG and Hottie respectively
Thumb: Naked nail, Hottie on top, SG on the bottom


On the left is the oh so beautiful "love nails." (Aptly named haha)
On the right is ocean side, a lovely color.


Both of the comparison colors are very close. They both go onto the nails very easily with only one or two coats being full coverage. Relatively speaking, SG only cost a collar but gets you 5.3 ml of polish, whereas not on sale Sinful Colors is two dollars but gets you 15ml. Personally, Sinful Colors would be my choice as:
1. It is more cost effective, and
2. You can buy Sinful Colors pretty much anywhere, whereas sally girls are mostly sold at Sally's Beauty Supply.

Hope you enjoyed reading this!

Until next time,
Peace,
Rikya

P.S. Please check out my facebook page! https://www.facebook.com/GoPolishYourself

New Facebook page

I am now at a facebook page!
If you want to like my page, its at https://www.facebook.com/GoPolishYourself
Hope to see you all there!

Until next time,
Peace,
Rikya

Thursday, January 3, 2013

Sinful Colors What's Your Name and OPI Unripened


Sinful Colors What's Your Name
So I got inspired to do this post because one of my friends Jenna behind the fb page I'm Still Thinking did a post on OPI's Unripened, and I realized that it was a dupe for Sinful Colors What's Your Name. I don't have the OPI to do a side by side, but with Jenna's permission I have her photos to show the comparison! :) 
Courtesy of Jenna behind
http://www.jennafroggy.com/
Swatch shot

With accent nail thumb of Honey-Dew You Love Me
by Nicole by OPI


Front bottle shot of Nicole by OPI's Honey-Dew You Love Me?
Side bottle shot: Look at the glitter!!


If I was to be critical of the polishes that I had, which were Honey-Dew You Love Me and What's Your Name, I would have to say that the polishes kind of underwhelmed me. Don't get me wrong the concept of a  duochrome in a black base does appeal to me a lot, but the duo chrome was not clear and defined enough. It didn't stand out in pictures either :( As for the Honey-Dew You Love Me, the glitter base was great, however, the heart shaped glitter pieces did not consistently come out as well as I had hoped for.

Hope you enjoyed reading this!

Until next time,
Peace,
Rikya